April 26, 2018 | Digital Marketing , SharePoint
Today, with information being the essence of any website, providing relevant and information to users is of utmost priority. Microsoft SharePoint Online is a leading and most efficient cloud-powered platform for hosting dynamic and attractive websites. Apart from a faster processing speed and top-notch data security features, SharePoint also offers the easiest way to update your website by letting you add webparts on SharePoint Online pages efficiently.
What are Web Parts?
The webpart is any of the numerous basic components that together form a complete modern website today. To update information on websites we need to add a webpart, such as text, image, video, file, or other dynamic content.
These are the web parts that can be added, or moved, and removed from your SharePoint Online website:
Steps to add WebParts on SharePoint Online Pages
As compared to others, when you use Microsoft SharePoint to manage your website, there are immense distinct benefits that you can witness. The efficient development of your website on this innovative cloud hosting platform allows you to easily add webparts on SharePoint Online pages.
These simple steps will guide you when you wish to add or update content on your SharePoint Online website:
To Add a Web Part
Step 1
Open the specific page on your website which needs to have a webpart added to it.
Step 2
Select ‘EDIT’ from the top-right corner of the page, if it not already in the mode.
Step 3
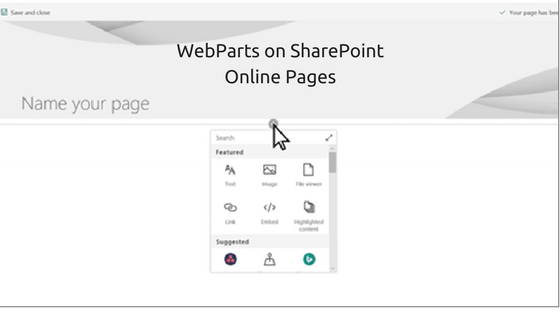
When you scroll your mouse pointer above, or below, any webpart it will show a line with a ‘+’ encircled in the middle.
Step 4
Click on the ‘+’ button and a list of webparts will be displayed from where you can choose the one you wish to be added. If you cannot find the required webpart in the list being displayed, click on the ‘SEARCH’ box and type in its name. Or else, you can click on the Expand button given on the right of the Search box. This will display a larger view and provide web parts according to individual categories.
To Move or Remove a WebPart
Step 1
Go to the page you wish to move/remove web parts from. If it is not in the edit mode, you can click on the ‘EDIT’ button on the right side of the page.
Step 2
Scroll your mouse pointer to the webpart you wish to remove or move, and it will display a tool bar on the left side of it.
Step 3
To move a web part, simply click on the ‘MOVE WEB PART’ button and drag it to the new location.
To remove a webpart, simply click on the ‘DELETE WEB PART’ button.
These simple steps are most helpful in keeping your website updated with the latest and most relevant information for your users, which in turn, also benefits your SERP listings too.


atQor is a Microsoft Technologies focused boutique consulting, project services and product development company that aims to help end users increase business productivity by automating processes and compliance reporting.